The Emergency Planner: A Brief Tutorial & Example Pages

Why hello! Please, come on in & make yourself comfortable, we were just about to dive into some examples on how to use our Emergency Planner! In case you don’t know, our Emergency Planner was designed to be used when you have a lot to do but no idea where to start; this two step system will help you get it all down and sorted all out! By the way, it’s totally free! You can download yours here 🙂
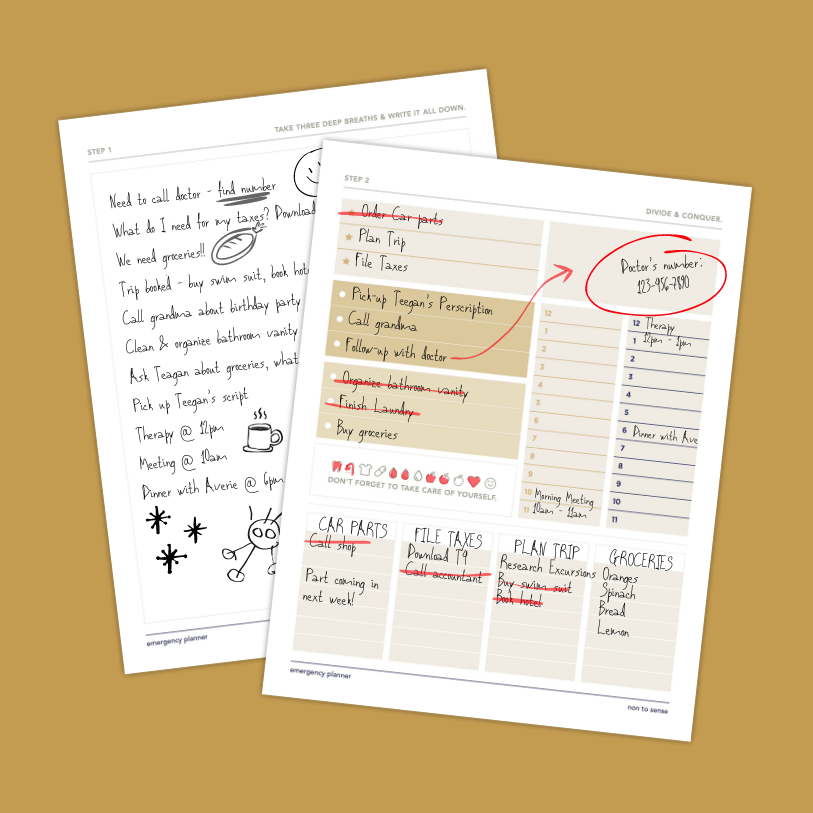
Like we mentioned, this is a two step system, so that means there are two pages! Step 1 is a brain dump page & step 2 is a tasking page. The way you use this planner is simple:
STEP 1: take three deep breaths to calm your mind, then write down everything that is taking up space or overwhelming you onto the brain dump page, in no particular order, by no particular importance.
STEP 2: take that brain dump & organize it into clear categories, effectively constructing a plan on how you will tackle your tasks!
In this article, we are going to go through examples on how you can organize your tasking page in step 2.
For a more in-depth tutorial on how to use the entire planner, watch our YouTube tutorial below 🙂
Tasking Page Overview
A Summary 1-pager

There are many ways you can organize The Emergency Planner’s tasking page, but before we dive into the examples, we’ve created a sort of 1-pager summarizing the different ways you can use the planner page, by each section.
Feel free to save the above image for later!
Now for some specific examples…
EXAMPLE ONE:
A General Task List for Personal Use

In the above example, tasks are broken out by priority 1 to priority 3. The free space above the schedule has been used as a place for a quote of the day, a sort of sweet reminder if you will that you can take with you through your day or even your week!
The free spaces at the bottom of the page are being used to plan the rest of this person’s week, because sometimes its nice to spread out your priorities over a couple of days rather than stressing yourself out by trying to complete them all in one day. We are only human after all!
PRO TIP! In an example like this, if you print this planner & fill it out with pencil, laminate it & use a dry erase marker, or if you use it digitally on an app like GoodNotes, you could erase the schedule and ticked off icons daily so that you could continue to use the one page for a full week!
EXAMPLE TWO:
A Group Project of Three People

Whether for school or for work, this planner could be great for managing a group project. In the above example, the main tasks are broken out by person, with each section labeled with the person’s name. The free space above the schedule is being used to call out important dates & deadlines, while the free spaces at the bottom of the page are being used to detail each person’s tasks, with the final free space being used as note taking/brain dump space.
If you’re working in the same space as your colleagues, the icons reminding you to do things like drink water (three water droplets) & practice self care (heart), can act as reminders for the whole team!
Sometimes we are better together!
EXAMPLE THREE:
A Solo Project

In the case above, we’ve created a scenario where a student may use the planner to manage a school project like an essay. The tasking section has been broken out into three clear steps involved in completing this project, marked as step 1, step2, & step 3, to help compartmentalize & simplify the project into parts. The free space of the schedule is being used for deadlines, while the free space at the bottom of the page is being used for idea generation, thesis building, & also, as seen in the last box labeled as “Peer Review”, to break down a main task into sub tasks.
EXAMPLE FOUR:
Household Chores for a Couple

Personally, I would much rather sit, relax, & binge watch my latest TV obsession with my partner, but chores need to be done, & so using this page to delegate & split said chores with a loved is perfect way to use this planner, especially if one of those loved ones has ADHD (its me, I am that loved one).
Above you’ll see that the tasks section is split up by chores that can be tackled by anyone, labeled as “household”, while the next two boxes are labeled by name and used for key chores for each partner, labeled as “Averie” and “Mikey”. The free space above the schedule is being used to break out one of those shared household chores into sub tasks, specifically “living room deep clean”. I personally love to write out every little thing that needs cleaning so it feels extra satisfying when I get to check it all off!
The free space at the bottom of the page is being used to list out dinners for the week, keep track of groceries that need picking up, as well as note spaces for each partner, which could also act as a sweet little place for a little love notes <3
We hoped you enjoyed this tutorial! If you have any questions, please do not hesitate to reach out, which you can do here 🙂
All the best, & don’t forget to keep on keeping cool, calm, & coordinated!
Much Love,
The N2S Team <3
Averie, Leandra, & Marcio
Back to The Grapevine